

Picking up the Pieces
Share
View the latest digital editions of all of our publications or head straight to the archives
Share
For years, it was the most expensive-to-repair non-critical automotive system. It’s still the convenience feature that combines high demand with a puzzling lack of consumer interest in maintenance or system performance. Until, that is, it goes wrong. Unlike most other convenience features, however, automotive air conditioning has become an integral part of many vehicles’ HVAC systems. So much so, it simply has to work to avoid codes, whether the customer likes it or not. What hasn’t changed is the fragility of system components like compressors and the need for careful service. Before replacing damaged components, however, there are a several pre-service factors that should be considered.
Finding Leaks
Loss of refrigerant is the most common starting point for major component damage. Unfortunately, leaks are rarely rapid enough for the low pressure cutout to trip and before the compressor has had time to struggle without a sustainable duty cycle or adequate lubrication. According to the latest MACS (Mobile Air Conditioning Society) Recommended Service Procedures guidelines, technicians should approach leak testing from two directions: vacuum and pressure. The vacuum method is simply drawing down the system and measuring how long it holds vacuum with the pump off. Ten minutes is a typical duration. Occasionally, the leak point is audible, but another possibility (a split header in an evaporator, for example) is that the leak will seal under vacuum. To avoid that false test, pressure must be applied instead. One method is to charge the system with a small quantity of refrigerant, about 20 per cent of the total system charge. Why 20 per cent? That’s the quantity which will result in both liquid and vapour-phase refrigerant, so adding more won’t increase system pressure anyway. It’s not necessary to evacuate before the test, since air will be recovered with the test refrigerant by the recovery machine. Add dye at this point if that’s the preferred test method. If you plan to run the system, however, the full factory charge is needed since the low pressure cutout will disable the compressor. Use at least 50 psig for a reliable test.
Warming the system helps find smaller leaks and engine heat can accomplish this. It’s essential, however, to disable the compressor, which may be as simple as pulling the clutch connector, or as complex as programming an on-board controller board on newer vehicles and requiring a check of your repair database. After disabling the compressor, set the controls for maximum cold, outside air, high fan speed and direct the flow through the dashboard ducts. Idle the vehicle for 15 minutes with the hood open and then leak check immediately with the engine off. Can you use a bottled gas like nitrogen to pressurize the system? Maybe, but without the natural running conditions of two-phase refrigerant, high pressures, often 200 psi or more, are required. Any weakness in the system will rupture, which may be a useful test in itself, but could also split serviceable components, especially evaporators.
Soap, dye or detector?
The traditional method for tracking down leaks originates in the refrigeration industry: soap bubbles. It’s cheap and easy to use, but is limited when used for mobile A/C service. A one-bubble-per-second leak can discharge over 50 ounces of refrigerant per year, a rate which could cripple an automotive system in weeks or days. Soap can be useful for large leaks in tough to access places, but it’s too coarse a test for most automotive work. Dyes work, but they need to be dispersed throughout the system, ideally for hours before testing. Dyes are best used with an eye toward future diagnosis and repair, but leaks can be difficult to spot if left too long due to exposure to air and the possibility of the dye washing off or becoming encrusted with under hood grime. They’re a logical addition when charging, but use no more than the recommended amount to avoid compressor lubrication issues.
Electronic detectors are the most sensitive and most expensive technology, but an SAE-compliant detector can spot a leak of half an ounce per year, roughly 100 times the resolution of the soap solution method. When using electronic detectors, follow the manufacturer’s instructions and consider how the detector operates. Dirt, oils and debris should be wiped from components before testing, but cleaning solvents can set off some detectors. In fact, many under hood or under dash sources that outgas can give false alarms, including factory sealants or gasketing material. Most detectors require that technicians work slowly, no more than a linear inch or two per second, when tracing lines. Never jab the probe end into a dirty or grimy component and don’t expose the detector to a stream of refrigerant. Also remember that the first leak may not be the only leak, so mark the alarm location and keep looking until the entire system is checked. Evaporators are the most difficult to test, but refrigerant is heavier than air, making condensate drains a good place to both probe and check for dye. For the same reason, it’s necessary to probe the lowest point of dashboard ducting. Its meticulous work and many technicians use both dyes and detectors, with the black light as a fast check followed by the detector. It’s also important to know what the system was charged with: many SAE J1627-compliant detectors will trace only R12 and R134a, so it’s important to know if alternate refrigerants have been used.
Flushing
Most failures follow a similar pattern. Many are rooted in switches, control electronics or relays. But on the mechanical side, it’s usually about loss of refrigerant charge and compressor failure. Compressors can fail from “slugging,” where the unit digests liquid phase refrigerant. Liquids are not compressible and something has to give inside the unit. This can result in something as little as bent reed valves, or in something more serious as compressor innards that resemble a bowl of cornflakes. Catastrophic failures are often seen, but the more common scenario is death due to lubricant starvation. When it dies, circulation stops and the damage done is localized. But in the days, hours and minutes before it fails, metal debris is pumped throughout the system. Residual debris is the largest single reason for premature replacement compressor failure and is a major training focus of compressor manufacturers and rebuilders, for obvious reasons. Historically, jobbers and rebuilders have honoured compressor warranties regardless of technician error, compounding the problem and creating a widespread belief that rebuilt compressors have an unusually high natural failure rate.
The obvious solution is to flush the system. It’s conceptually simple, so simple that little time is devoted to flushing in most training programs. As a result, technicians have many techniques and ideas about flushing media. What’s the right fluid? Technicians have used everything from gasoline to alcohol and paint thinner, each claiming success. The easiest solution is to use the specialty flushing compounds sold for the purpose, but if you choose to use another solvent, think about it carefully. It has to dissolve lube and residues from dyes, refrigerant and sealants, carry away solid debris and then evaporate completely without leaving behind any residue of its own.
How can you be sure that your solvent will evaporate without residue? A useful test is to put a few drops on a piece of clean glass and set it aside to evaporate. If any residue is visible, reject the solvent. Lacquer thinner (mainly acetone) is a popular choice because it dissolves many oil-based and water-based contaminants and evaporates quickly. It’s also a serious fire hazard and its vapours are toxic, so safe use in a typical shop environment is a serious concern.
Many technicians believe that blowing compressed air through the system will remove all traces of solvent, but consider the possible traps. Mufflers are an obvious problem and many condenser designs make effective flushing impossible. Evaporators usually flow more freely than condensers, but there’s no way to effectively check them in place. Accumulators and receiver/driers are replacement items, but in general, any place where solvent can pool will be a potential risk. In addition, most shop air is notoriously damp and dirty; many techs prefer to use clean, dry nitrogen instead.
Solvents attack the gunk in the system, but they can also eat O-rings and gaskets after reassembly, so getting it all out is crucial. Can you eliminate the flushing step with an in-line filter upstream of a new compressor? If the debris contamination is light, maybe. But what about the orifice tube or TVX? From a cost or profitability perspective, there’s no substitute for a clean system when replacing major components. Since proper flushing involves considerable disassembly, consider component replacement as an option for condensers, hose assemblies, FOT’s and TVX’s and always for accumulators and receiver/driers.
It’s possible to write a book about just the diagnosis of automotive HVAC systems and no one article can cover it in its entirety. An excellent resource is the Mobile Air Conditioning Society’s Internet site, www.macsw.org. Their 23-page MACS Recommended Service Procedures is available for download at www.macsw.org/service.php
Black Death
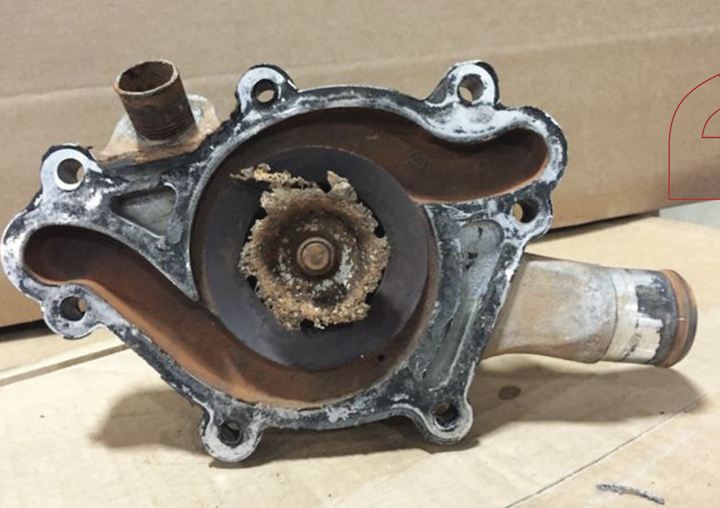
Black Death is the popular term for the result of system lubricant breakdown and the resulting wear particles from the compressor contaminating the rest of the system. What causes Black Death? An insufficient oil charge during assembly is a possibility, as is operation of the system with a low refrigerant charge, since it’s needed to carry the oil. Use of an incorrect lube can be a problem, but regardless of the cause, once excessive wear begins, metal fragments collect in choke points like the orifice tube where they further impede the flow of lube, making the problem worse. By the time a technician receives the vehicle, it’s usually terminal and an expensive repair is inevitable. The major North American Internet bulleting boards reveal that technicians encounter Black Death often on Ford and GM vehicles with FS 10, FX 15 and V 5 compressors. There are many others; it’s common for condensers to fill with the resulting shrapnel, making thorough flushing and replacement of both compressor and condenser the minimum for a reliable repair.


Leave a Reply