


Keep it Flowing
Share
View the latest digital editions of all of our publications or head straight to the archives
Share
Summer means heat and with many areas of the country enduring record temperatures, automotive cooling systems are taking a beating. Water pumps are a traditionally simple job, but cutting corners can create a comeback in what should be one of the most profitable jobs in any shop. It’s more common sense than rocket science, but see if you consider the following factors before reaching for the ratchet.
1. Is the new of reman unit an exact replacement? Lay out the new and old unit side by side and check that the mounting flange is the same pattern, pulley mounting flanges match and are the same distance from the gasket mounting face. Some issues are critical. For example, the gasket flange thickness of pumps for Ford 300 cubic inch six cylinder engines was increased after the 1992 model year. Use a pump with the older thin flanges with late model bolts and the bolts can bottom against the number one cylinder wall, distorting it or damaging the block.
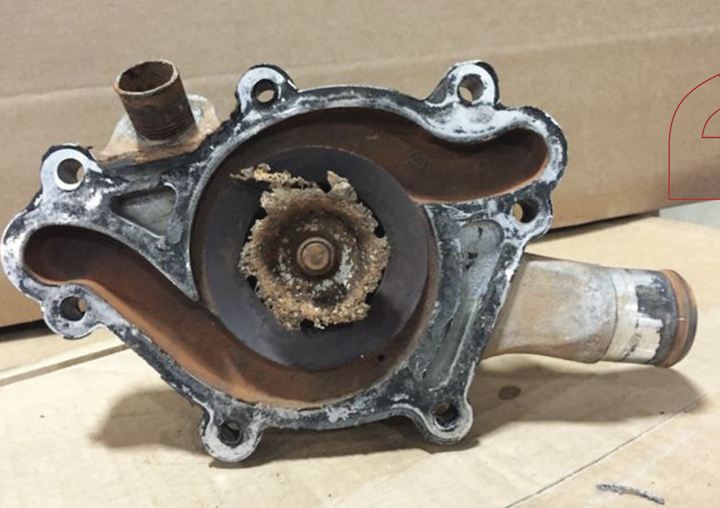
2. What was in the cooling system before the failure? If the pump leaked badly, there’s an excellent chance that an aftermarket sealer was used. With potentially abrasive solids floating around the system, seal and bearing life can be shortened, and the warranty compromised. Ask the owner if they added anything to the cooling system when they noticed the problem, and if you suspect that’s the case, flush thoroughly before installing the new pump.
3. Think about sealants. There are anerobics, silicones, pipe dopes, and increasingly, dry fitted rubber O-rings. You need an even coat, but excessive amounts of sealant mean rubber floating through the cooling system. If you’re working in a tight space, an increasingly common occurence with modern engines, the temptation to use a dab of sealant to retain an O-ring during installation is great. Avoid it if you can and definitely don’t use petroleum products like Vaseline or grease; they can degrade the O-ring material. Some can use clean motor oil (sparingly) as a sealing aid, so check the instructions.
4. Different doesn’t necessarily mean wrong. Ford, for example, consolidated three different part numbers for 1.6L four cylinder engines built through the mid ‘Eighties. The new part has been in the reman stream for years now, and it fits, but in some cases the impeller won’t clear. The solution is a thicker gasket, or two gaskets supplied with the replacement unit. Use a thin bead of “gasket in a tube’ and you could have problems, even though the part is good.
5. Metric or SAE? It may seem obvious, but some domestic models with older design V-type engines use both. An example are some GM pulley flanges, where similar parts can have either metric or SAE threads. You can’t tell by looking, so thread in a stud or bolt before assembly to be sure. And never force the wrong type into a threaded hole, even if the pump otherwise fits the application.
6. Finger tighten first. It should never be necessary to pull a pump into place with bolts or nuts. Dry fit the pump into position before adding sealants and fasteners to be sure the flange fits flush. Bolts or studs should go fully into the block or front cover with fingers only. If they don’t check for bent or improper bolts or studs. Consider where the bolts go into the block or front cover. The classic examples are the 2.8 litre GM 60-degree V-6 engines which require a special clamp to be fitted before removing the water pump. That’s because some of the mounting bolts also retain the front cover to the block. Spin them out indiscriminately and you risk coolant seeping into the oil pan.
7. Think about the shaft. If you’re replacing because of a shaft or bearing failure, as opposed to high miles, look at causal factors. Does the fan have loose, damaged or missing blades? Imbalance can kill water pumps. Look at fan clutches for the same reason. Broken engine mounts can also be a factor by allowing the fan to strike the shroud. Is the drive belt the correct length and not over tight? Is it routed correctly?
8. Ever lose a bolt? We all have, but reaching for a replacement should be done with care. A exact replacement cap screw is best, but if you have to substitute, use the same overall length and check that the under head area has the correct surface area on the bolt hole boss. Use a washer if necessary for even clamping and proper torque readings, but don’t stack washers to allow the use of a too-long bolt. Stacked washers are a major reason why bolts loosen and fall out.
9. Give the new pump a fighting chance. Clean the rad and check the shroud for cracks, loose or missing parts. Use the correct coolant at the factory-specified concentration, and inspect and/or test the pressure cap. In fact, a pressure test is a great way to uncover other flaws in the system after you’ve replaced that leaky pump. Remember that you’re replacing the pump, but the customer expects a pressure tight system so correct all the mechanical issues now to avoid the customer relations issues later.


Leave a Reply