

COMMENT: Sticky steering
Share
View the latest digital editions of all of our publications or head straight to the archives
Share
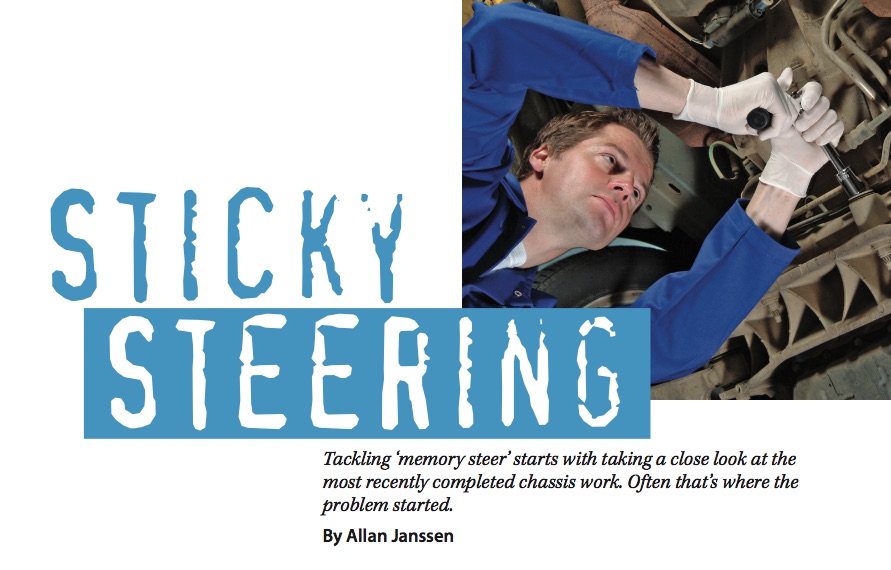
By Allan Janssen
It’s not uncommon for technical help lines to get calls related to a suspension issue in which the steering wheel doesn’t want to return to center after a turn.
Not to be mistaken for a normal steering pull (which could stem from an alignment issue or a low tire), this condition is called ‘memory steer’ because instead of straightening out, the vehicle continues to pull in the direction it just turned.
In other words, it has a “memory” of that steer.
It can be caused by a number of factors, but many will tell you it can often be traced back to simple installation error.
“The most common occurrence is post-part replacement,” says Mac McGovern, director of marketing and training at KYB Americas Corporation, maker of KYB shocks and struts. “Vehicles don’t often manifest that kind of symptom due to wear or age. Most parts tend to deteriorate or become looser over time, rather than tighter. So, in that sense, memory steer is not so much an ‘Alzheimer’ thing as a ‘youth’ thing. More likely it’s because of a poor quality part, or a poorly installed part, rather than wear, dirt, or fatigue.”
Matt Housewright, a “Guru on Call” with Federal-Mogul’s Garage Gurus Technical Education Network, agrees. He says suspension work is still viewed by some do-it-yourselfers as relatively straight forward. “We’re getting more calls on this than ever on this issue,” he says. “You really have to watch out for errors in DIY jobs.”

He says an increasing number of amateurs tackle steering and suspension work without adequate knowledge of proper procedures or torque specs. So a key question you should ask when trying to diagnose memory steer is, “Did the problem exist prior to installation of new parts?”
If shocks or struts have been replaced, examine all related components, with a particular focus on the upper strut mounts.
“For most modern vehicles with strut suspension, the most common cause of memory steer is the bearing in the upper mounting plate,” says Joe Bacarella, manager of technical research center, and product training for Tenneco’s Monroe brand of shocks and struts.
Lack of free bearing movement will cause the stickiness that people report with memory steer. If you look you can sometimes find evidence that the inner bearing has “skidded” inside the strut mount. That can stem from compression force damage, perhaps from a defective jounce bumper when the vehicle bottomed out. Crushed parts tend to stop functioning smoothly.
“Sticking or binding can be a real problem,” says Bacarella. “And it’s the kind of thing you look for once you’ve seen it before.”
Proper inspection also includes checking the upper mount for degradation, the bearings for grittiness, contamination, and free movement, the upper spring seat for structural integrity, and the dust boots for rips or tears.
“When you take the system apart, you need to pay close attention so you can reassemble them in the right order,” says McGovern. “There are a lot of small parts, like bushings and insulators and washers. You really have to watch those things.”
When you install, connect the upper mount first, but don’t tighten it down. Start one or two of the nuts and leave them fairly loose, so the strut assembly can settle and align in the proper place. Then put the lower mounting bolts on. Lower the car on the alignment rack to proper ride height (not hanging) and jounce it a couple of times to allow the components to settle properly. Then tighten all nuts to specification at the vehicle’s static ride height.
On light trucks, the problem is more likely to be related to ball joints, says Housewright.
“When it comes to ball joints, you can’t stress enough the importance of proper torque procedures and following the step-by-step installation procedures,” he says.
Rookie mistakes like hammering in the ball joints, or using a press on the wrong area of the ball joint, will cause a binding or resistance in the returnability of the steering wheel back to centre.
“If you have memory steer, that returnability is not happening anymore,” he says. “And it’s very unnerving when it happens. When you lose it, you’ll know it!”
Technicians should take the opportunity while the suspension is apart, to remove and clean the camber/caster sleeve so it’s able to move freely. If it’s seized or damaged, replace it. Also inspect the steering knuckle itself for damage. Clean dirt, rust, and burrs from bore and recess, including the recessed area into which the ball joint flange fits.
“That knuckle has to move freely. If it doesn’t do that, the restricted motion will replicate itself on the road,” says Mike Caron, a technical product specialist for Mevotech.
He also cautions against the improper use of a ball joint press. Never use the press without the proper adapter, and make sure the adapter fits the outer flange area. Placing the press directly on the ball joint can cause damage.
“If you press a ball joint and you hit the crown and not the flange—and some applications don’t have much of a flange on them—you could crush the Belleville spring and you will instantly create a memory steer issue,” says Caron.
Finally, use the correct torqueing sequence when installing the ball joint. Start by hand-tightening the lower ball joint. Then place in the camber/caster adjustment sleeve for the upper ball joint. Do not tighten the upper ball joint yet. Just hand-tighten the nut. Using a torque wrench, torque the lower ball joint to about 35 ft-lbs. Then torque the upper ball joint to 70 ft-lbs. Then re-torque the lower ball joint to specification (anywhere from 150 to 190 ft-lbs). Do not use an impact wrench.
“The ball joints have to be torqued to very specific specs,” says Caron. “They have to be installed with a torque wrench that goes ‘Click-click,’ not an impact gun that goes ‘Zzzzt-Zzzzzt!’ The impact guns are great for taking things apart. They save a lot of time. But they’re not designed to put things together.”
Asking the right questions, inspecting all parts thoroughly, and installing new parts carefully are the keys to eliminating memory steer.
I have got to strongly disagree with some of the comments here ,I agree proper assembly is important but saying components become loose over time not tighter is totally incorrect ,in non greasable front ends we routinely see memory steer due to ball joints and tie rods “drying out” and losing the factory loaded grease ,causing them to tighten up and become stiff ,you will typically not feel or see any play ,but if you un hook the tie rod you can barely turn the knuckle by hand ,and often it’s the stabilizer links as well becoming so stiff they won’t pivot any more causing memory steer ,so like mentioned earlier it’s important to know if the problem was there before any repairs ,if so we find it to usually be a dry ,seized ball joint or stabilizer link


Leave a Reply